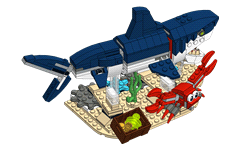

This is an updated design to my kinetic stand for the shark from LEGO set 31088 Deep Sea Creatures. This version of the stand has a much simpler design than the original, using less Technic pieces and more System parts. It also adds the opening and closing the Shark’s mouth, which really brings the shark to life.
You can see a demonstration of the model in the video below, and continue reading for the building instructions and design notes.
A full kit for this model is also available from BuildaMOC, if you want to conveniently get all the pieces needed to build it.


It turned out not to be too difficult, thanks again to some newly released pieces, though it’s definitely not any kind of standard connection. The lower jaw rests loosely on top of a transparent antenna, which is hinged at its base. As the head moves from side to side, the angle of the antenna changes, raising and lowering the top, and the jaw resting on it.

In addition to the stand, several changes need to be made to the shark itself. This involves replacing all of the body joints, and the lower jaw hinge, so they all move freely. In the original model these are all stiff connections.
To accomplish this, you will follow a mix of custom building steps and steps from the original instruction manual. It should be pretty clearly indicated in the instructions which steps to follow and when.
As noted above, the ‘connection’ of the jaw to the antenna is not a standard connection. The top of the antenna sits loosely in the underside of the round plate with bar attached to the bottom of the jaw. I have not had any issues with it falling out during normal operation, and either version of the antenna (flat top or rounded) should work.
The orientation of the plate gears, and the location of the turntables on top of them, are critical. These are very clearly indicated in the instructions, so be sure to pay special attention to them.
The parts list only includes the parts needed to build the stand and modify the shark. You will need the parts from the original set as well to build the full model.


This entry was posted in Instructions, Models and tagged animals, kinetic sculpture. Bookmark the permalink.
This is awesome! Thank you! I haven’t been able to get the antenna to stay on but will keep trying. ☺️
Just finished this for my shark-mad daughter in law, it’s absolutely great.
I’d like to motorise it in the future – can you please show photos of your set up? I’m in the uk so motor options may be limited (I’m a newbie).
I ordered the kit from BuildaMOC… What motor/parts list did you use for the YouTube short to automate this?
I used a Power Functions motor and 12 tooth double bevel gear, mounted to mesh with the 20 tooth bevel gear on the model.
Just a note, I built two sets of these. My son’s version had no issues with the antenna staying in place. However, mine did. I realized that at the widest travel of the antenna, the jaw that was on the hinge was getting pushed out of the pin and consequently having the antenna drop. I ended up placing the pin for the joint on the other side (mirrored) so that at the max travel, the jaw wouldn’t fall out of position.
Thanks for the feedback, I will likely update the instructions to build it that way. Joseph H Bielinski on November 25, 2023I love that you revisited the mechanical functions of this cool build. I would love to see what you can do with some of the newer smaller 3 in 1 sets. Correction, I need to see what you can do with some of the newer 3 in1 sets…. Please?
John Clark on November 11, 2023 Thank you, Jason. Another wonderful creation.This is great. My son and I will be working on this over the weekend. Thanks for sharing your genius!
Enjoy what we do? Consider supporting our work.
Or use these affiliate links to shop from LEGO's online store.